Connect the power inlet to your Pix-Star frame and turn it on using the remote control or onboard control buttons. Give the frame a moment to power on and load. From the home screen, look at the top-left corner of the display. Next to the Pix-Star logo, you\u2019ll see a Wi-Fi symbol and a globe icon. If there is a line through the Wi-Fi symbol, you aren\u2019t connected to Wi-Fi.
To connect to Wi-Fi, go to the \u201cSettings\u201d page, navigate down to \u201cWi-Fi\u201d and press \u201cOK\u201d. Choose your Wi-Fi network and press \u201cOK\u201d. Type in the password using the onscreen keyboard and remote control. Click \u201cJoin\u201d to connect. Note that you can\u2019t connect to Wi-Fi networks that require web authentication (Wi-Fi networks at coffee shops and some hotels).
Make sure the Wi-Fi symbol shows it\u2019s connected and that the globe icon is blue. This means your Pix-Star frame is online and ready to connect to the web interface and receive photos by email, mobile app, etc."}],"image":{"@type":"ImageObject","@id":"https://www.pix-star.com/blog/how-to-guides/how-to-remote-control-a-digital-photo-frame/#schema-image-3d086605b5aaa951552e5a4771d70f58","inLanguage":"en-US","url":"https://www.pix-star.com/blog/wp-content/uploads/2021/07/main_view-e1627980313655.png","contentUrl":"https://www.pix-star.com/blog/wp-content/uploads/2021/07/main_view-e1627980313655.png","width":800,"height":534,"caption":"Pix-Star digital photo frame home screen"}},{"@type":"HowToStep","url":"https://www.pix-star.com/blog/how-to-guides/how-to-remote-control-a-digital-photo-frame/#how-to-step-1628146010467","name":"Log into your Pix-Star frames dashboard","itemListElement":[{"@type":"HowToDirection","text":" Head over to pix-star.com (on a computer\u2019s internet browser) and click \u201cLogin\u201d in the top-right corner of the screen. Input your login information (all you need is your Pix-Star frame\u2019s email address and the password). Click \u201cLogin\u201d when you\u2019re ready. This will log you in to your user account.
Now you can log in to your Pix-Star frame\u2019s dashboard. If you\u2019ve registered your Pix-Star frame before, you just need to click on your frame at the top of the screen. This takes you straight to the dashboard where you can control your frame.
If this is the first time using the frame, click on \u201cRegister a New Frame\u201d at the top of the window. Follow the on-screen instructions to register your new frame. Note that the serial number for your frame can be found in the \u201cAbout\u201d tab of the \u201cSettings\u201d page on your Pix-Star frame. Input the number next to the \u201cSerial Number\u201d into the field in the web browser and click \u201cCheck availability\u201d. Follow the instructions from then on to register your frame. Once you\u2019re done, click on the frame\u2019s name to enter the dashboard.
The dashboard is where you can remotely control any connected Pix-Star frame, import photos from social media and photo-sharing sites, manage cloud storage, and more. Now let\u2019s take a look at how to change your Pix-Star frame\u2019s settings remotely through the web interface."}],"image":{"@type":"ImageObject","@id":"https://www.pix-star.com/blog/how-to-guides/how-to-remote-control-a-digital-photo-frame/#schema-image-25580f471757d1385f1814513e1c2100","inLanguage":"en-US","url":"https://www.pix-star.com/blog/wp-content/uploads/2021/08/InkedPix-Star-Dashboard_LI.jpg","contentUrl":"https://www.pix-star.com/blog/wp-content/uploads/2021/08/InkedPix-Star-Dashboard_LI.jpg","width":2128,"height":1185,"caption":"Pix-Star Web Interface Dashboard"}},{"@type":"HowToStep","url":"https://www.pix-star.com/blog/how-to-guides/how-to-remote-control-a-digital-photo-frame/#how-to-step-1628146041657","name":"Configure your Pix-Star frame remotely","itemListElement":[{"@type":"HowToDirection","text":" Once you\u2019re in your Pix-Star frame\u2019s dashboard, navigate to and click on \u201cMy Frame Configuration\u201d in the left-side panel. This takes you to the page where you can change your frame\u2019s settings remotely. You can change \u201cDisplay settings\u201d, \u201cSlide Show Configuration\u201d, \u201cEmail Reception\u201d, and \u201cSystem\u201d settings. These settings give you almost the same level of control as you would have if you were using the frame in person.
\u201cDisplay settings\u201d is where you can change settings related to the motion sensor, auto-on/off, and energy-saving modes. \u201cSlide Show Configuration\u201d is where you change settings for the style, speed, play order & frequency, and whether to include videos in slideshows. \u201cEmail Reception\u201d settings let you adjust what happens to incoming pictures sent by email. You can also adjust the notification sound and whether new pictures are automatically saved (and where).
Finally, \u201cSystem\u201d settings let you change the language, view the firmware version & memory usage, and adjust the frame\u2019s screen brightness. Once you\u2019ve adjusted and fine-tuned your frame\u2019s settings and slideshow preferences, you\u2019re ready to start a slideshow."}],"image":{"@type":"ImageObject","@id":"https://www.pix-star.com/blog/how-to-guides/how-to-remote-control-a-digital-photo-frame/#schema-image-9776505f7aebad19697cbadf95a3f7c8","inLanguage":"en-US","url":"https://www.pix-star.com/blog/wp-content/uploads/2021/08/Pix-Star-Remote-Control-Dashboard-.jpg","contentUrl":"https://www.pix-star.com/blog/wp-content/uploads/2021/08/Pix-Star-Remote-Control-Dashboard-.jpg","width":1898,"height":908,"caption":"Pix-Star Remote Control Dashboard"}},{"@type":"HowToStep","url":"https://www.pix-star.com/blog/how-to-guides/how-to-remote-control-a-digital-photo-frame/#how-to-step-1628146066582","name":"Start slideshows from anywhere in the world","itemListElement":[{"@type":"HowToDirection","text":" From your Pix-Star frame\u2019s dashboard, click on \u201cSwitch Slide Show\u201d. Here you can remotely change the slideshow that\u2019s currently playing on your Pix-Star frame. All you need is an online frame and access to the web interface. There are four different slideshows to choose from.
\u201cPlay all the frame\u2019s pictures\u201d will start a slideshow that contains any picture saved to the frame\u2019s internal storage. This will also include pictures saved on a connected USB/SD card, web albums, and photo-mail. These slideshows will still follow the slideshow settings and are subject to play order, frequency, and \u2018ignore\u2019 settings.
\u201cPlay all web albums\u201d will start a slideshow containing only the pictures saved to the frame from imported web albums. These include photos synced from Facebook, Instagram, Google Photos, etc., and photos imported as web albums directly from your computer. These are the pictures found under the \u201cWeb Albums\u201d tab of your Pix-Star frame\u2019s \u201cMy Media Library\u201d. All other pictures will be ignored.
\u201cPlay inbox photos\u201d start a slideshow containing only the photos received by photo mail. This includes photos that were received from the mobile app and direct by email. It will also include photos that have been copied to this section into a created folder. This would be the case if you manually copied photos from a USB/SD card into a created folder in the photo-mail section.
Finally, \u201cPlay a slide show of a specific web album\u201d lets you pick a web album from a list of all the synced web albums. These web album names depend on what you called them (or what they were labeled as when the linking/importing process what done. Only photos in the selected web album will be included in the slideshow."}],"image":{"@type":"ImageObject","@id":"https://www.pix-star.com/blog/how-to-guides/how-to-remote-control-a-digital-photo-frame/#schema-image-af8a81e10cd1ecbe1cb91976e1feecfc","inLanguage":"en-US","url":"https://www.pix-star.com/blog/wp-content/uploads/2021/08/Pix-Star-Switch-Slide-Show-Interface.jpg","contentUrl":"https://www.pix-star.com/blog/wp-content/uploads/2021/08/Pix-Star-Switch-Slide-Show-Interface.jpg","width":1900,"height":908,"caption":"Pix-Star Switch Slide Show Interface"}}],"inLanguage":"en-US"}]}
In this guide, we look at how to remote control a digital photo frame as effortlessly as possible. We’re looking specifically at the Pix-Star digital photo frame – one of the best digital frames for families and elderly users on the market at the moment. With a broad set of features and the ability to easily remotely control any connected Pix-Star frame, you can make sure everyone in the family gets the right pictures at the perfect time! Let’s take a look at the simple steps you need to follow!
Make sure your Pix-Star frame is online
Connect the power inlet to your Pix-Star frame and turn it on using the remote control or onboard control buttons. Give the frame a moment to power on and load. From the home screen, look at the top-left corner of the display. Next to the Pix-Star logo, you’ll see a Wi-Fi symbol and a globe icon. If there is a line through the Wi-Fi symbol, you aren’t connected to Wi-Fi.
To connect to Wi-Fi, go to the “Settings” page, navigate down to “Wi-Fi” and press “OK”. Choose your Wi-Fi network and press “OK”. Type in the password using the onscreen keyboard and remote control. Click “Join” to connect. Note that you can’t connect to Wi-Fi networks that require web authentication (Wi-Fi networks at coffee shops and some hotels).
Make sure the Wi-Fi symbol shows it’s connected and that the globe icon is blue. This means your Pix-Star frame is online and ready to connect to the web interface and receive photos by email, mobile app, etc.
Log into your Pix-Star frames dashboard
Head over to pix-star.com (on a computer’s internet browser) and click “Login” in the top-right corner of the screen. Input your login information (all you need is your Pix-Star frame’s email address and the password). Click “Login” when you’re ready. This will log you in to your user account.
Now you can log in to your Pix-Star frame’s dashboard. If you’ve registered your Pix-Star frame before, you just need to click on your frame at the top of the screen. This takes you straight to the dashboard where you can control your frame.
If this is the first time using the frame, click on “Register a New Frame” at the top of the window. Follow the on-screen instructions to register your new frame. Note that the serial number for your frame can be found in the “About” tab of the “Settings” page on your Pix-Star frame. Input the number next to the “Serial Number” into the field in the web browser and click “Check availability”. Follow the instructions from then on to register your frame. Once you’re done, click on the frame’s name to enter the dashboard.
The dashboard is where you can remotely control any connected Pix-Star frame, import photos from social media and photo-sharing sites, manage cloud storage, and more. Now let’s take a look at how to change your Pix-Star frame’s settings remotely through the web interface.
Configure your Pix-Star frame remotely
Once you’re in your Pix-Star frame’s dashboard, navigate to and click on “My Frame Configuration” in the left-side panel. This takes you to the page where you can change your frame’s settings remotely. You can change “Display settings”, “Slide Show Configuration”, “Email Reception”, and “System” settings. These settings give you almost the same level of control as you would have if you were using the frame in person.
“Display settings” is where you can change settings related to the motion sensor, auto-on/off, and energy-saving modes. “Slide Show Configuration” is where you change settings for the style, speed, play order & frequency, and whether to include videos in slideshows. “Email Reception” settings let you adjust what happens to incoming pictures sent by email. You can also adjust the notification sound and whether new pictures are automatically saved (and where).
Finally, “System” settings let you change the language, view the firmware version & memory usage, and adjust the frame’s screen brightness. Once you’ve adjusted and fine-tuned your frame’s settings and slideshow preferences, you’re ready to start a slideshow.
Start slideshows from anywhere in the world
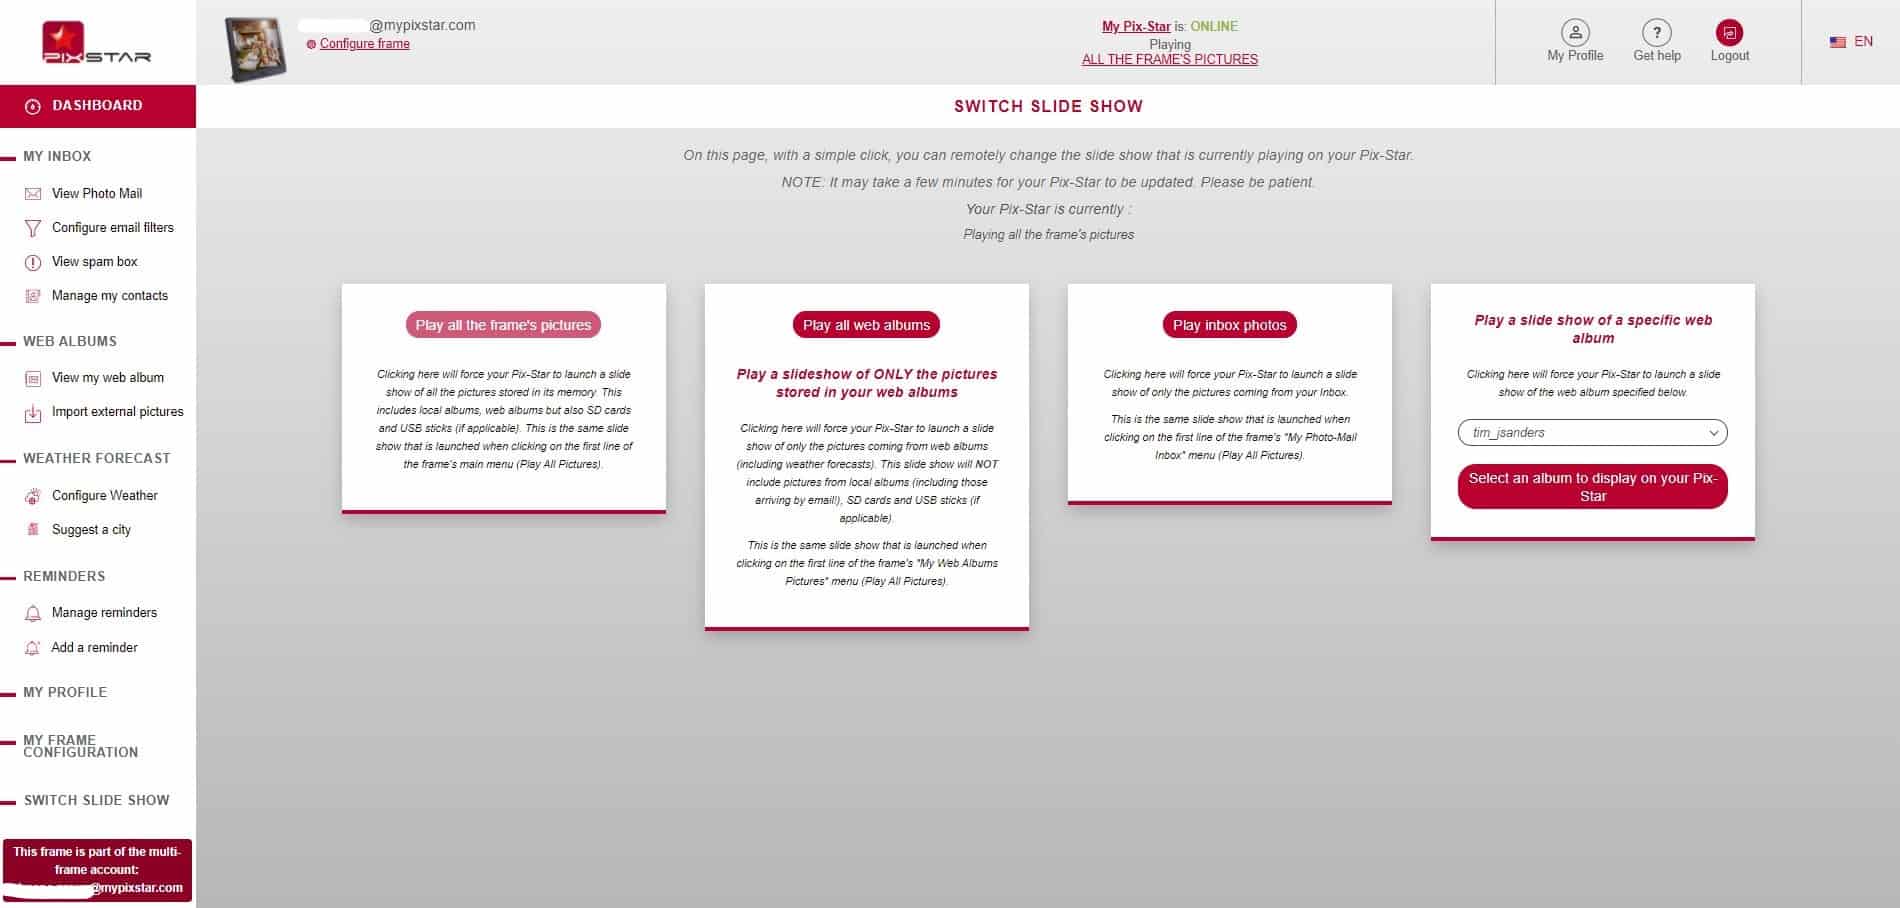
From your Pix-Star frame’s dashboard, click on “Switch Slide Show”. Here you can remotely change the slideshow that’s currently playing on your Pix-Star frame. All you need is an online frame and access to the web interface. There are four different slideshows to choose from.
“Play all the frame’s pictures” will start a slideshow that contains any picture saved to the frame’s internal storage. This will also include pictures saved on a connected USB/SD card, web albums, and photo-mail. These slideshows will still follow the slideshow settings and are subject to play order, frequency, and ‘ignore’ settings.
“Play all web albums” will start a slideshow containing only the pictures saved to the frame from imported web albums. These include photos synced from Facebook, Instagram, Google Photos, etc., and photos imported as web albums directly from your computer. These are the pictures found under the “Web Albums” tab of your Pix-Star frame’s “My Media Library”. All other pictures will be ignored.
“Play inbox photos” start a slideshow containing only the photos received by photo mail. This includes photos that were received from the mobile app and direct by email. It will also include photos that have been copied to this section into a created folder. This would be the case if you manually copied photos from a USB/SD card into a created folder in the photo-mail section.
Finally, “Play a slide show of a specific web album” lets you pick a web album from a list of all the synced web albums. These web album names depend on what you called them (or what they were labeled as when the linking/importing process what done. Only photos in the selected web album will be included in the slideshow.