Temps nécessaire : 3 minutes.
We’re taking a deeper look at how to play videos on the Pix-Star digital picture frame. You’ll be guided through the different methods and all the steps involved. Pix-Star’s frames are incredibly versatile and some of the most capable digital frames on the market. They’re great for video playback and there are no recurring or additional fees to unlock sending and playing videos. Let’s get started!
- Pix-Star’s Video Playback Requirements

Learning about the limitations is the first and most important step in learning how to play videos on the Pix-Star digital picture frame. Almost every digital photo frame has limitations on video playback length and format. Pix-Star is one of the more versatile options and supports video clips of up to 2-minutes long and a wide variety of formats are allowed.
The only way to send videos to your Pix-Star digital picture frame is by either the mobile app or the USB/SD card. Unlike many other premium frames, Pix-Star doesn’t charge a recurring subscription fee or any additional fees to unlock video playback and use of the mobile app. Videos are saved to your Pix-Star frame’s internal storage and automatically backed up to your free-forever cloud storage.
Now, let’s take a look at each of the methods for sending videos to your Pix-Star digital picture frame. - Send Videos with the Pix-Star Snap Mobile App

The Pix-Star Snap mobile app is one of the most intuitive and capable mobile apps for digital frames on the market. You can send up to 250 photos to multiple frames at the same time. It’s unique as you can send video clips to multiple frames at the same time – without any additional subscription fees or hidden costs. An intuitive interface and easy-to-use functions make this app a great choice for families and even for elderly users.
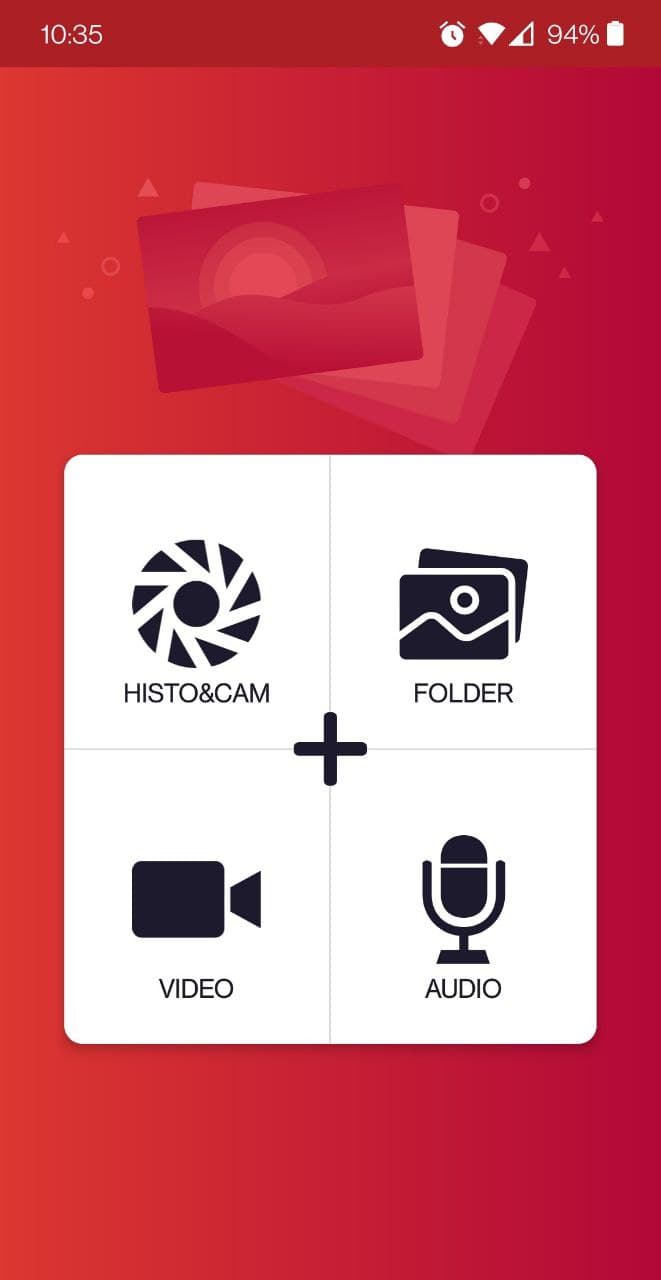
Video clips can be sent through the Pix-Star Snap mobile app. They’re sent directly to your Pix-Star frame through its dedicated email address. To send videos, open the Pix-Star Snap mobile app. Select the “Video” tile to go to the image/video browser. Here you need to select the video to send to your Pix-Star frame. If the video file is too long or too big, you won’t be able to send it to your frame (a 2-minute length limit).
Once you’ve clicked the video you want to send to your frame, select all the frames to send it to. You can add new receiving frames by pressing the “Add a Pix-Star Frame” option at the bottom of the interface. Select all the frames you want to send the videos to and click the send icon at the bottom right of the screen.
It might take a couple of minutes to send and load the videos to all receiving frames depending on the sizes and lengths of each video. Make sure all the receiving frames are online to ensure they receive the sent videos. - Copy Videos from a USB/SD Card

This is the only offline method for sending videos to your Pix-Star frame. It doesn’t require an active Wi-Fi connection and is great for users that don’t connect their frame to the internet very often – or live in areas with poor internet connections.
Load the videos you want to view on the frame to a support USB/SD card. There are no storage size issues and Pix-Star supports a wide range of SD cards and USB types. Make sure the videos meet the 2-minute length requirement and are in a supported format.
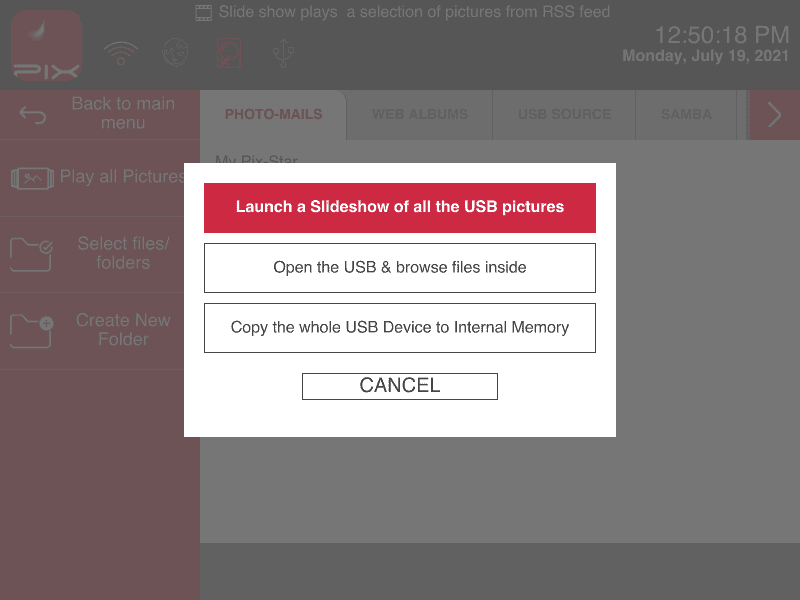
Insert the USB/SD card with the videos into the USB/SD card port on your Pix-Star frame. You’ll get a popup on your frame as seen in the image above. Selecting the “Open the USB & browse files inside” lets you access all the photos and videos on the connected USB/SD card. Here you can manually select and copy all the video files from the USB/SD card directly to your frame’s internal storage.
Selecting the “Copy the whole USB Device to Internal Memory” option automatically copies all of the photos, videos, and audio messages to the frame’s internal storage. You can select which files are copied. Note that the size of the collection to be copied needs to be smaller than the available space on your Pix-Star’s internal storage drive to avoid any errors and issues.
All copied videos and photos are available in the “My Media Library” which is found on the home page on your Pix-Star frame. - Include Video Clips in Slideshows

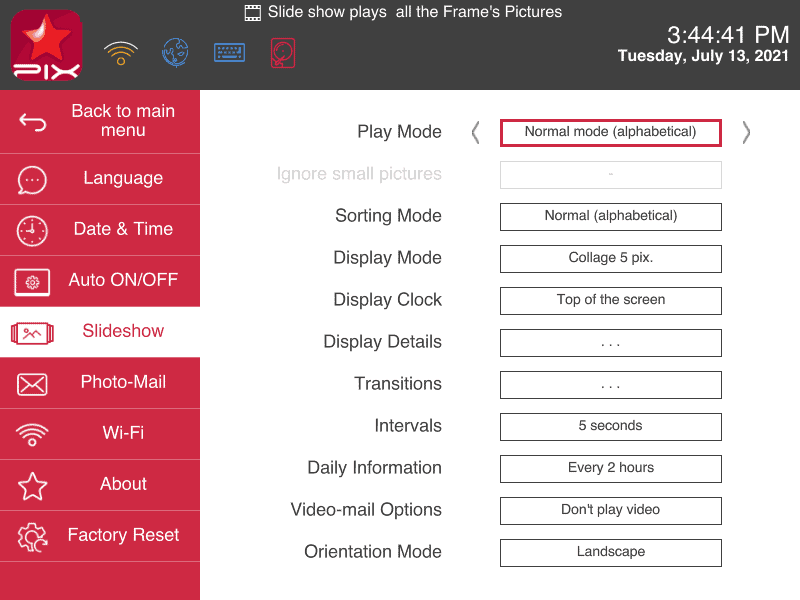
From the Pix-Star frame’s home screen, select “Play all the frame’s picture” and press “ok”. This starts with a slideshow containing all the photos on the frame. Inside the slideshow, press “Menu” on your remote control. This brings up a menu on the left side of the display. Use the remote control to scroll down to the “Slideshow options” at the bottom of the menu and press “ok”.
In the next menu, scroll down to the “Video-mail options”. This is where you can choose to include videos into slideshows with or without their sound. If you choose to include videos in slideshows, the whole video will be played. Play order and frequency are controlled by the same slideshow settings that pictures and audio messages are controlled by.
If you choose to play videos without their sound, they’ll still play at full length. The only difference is that they will be completely muted. Alternatively, you can simply adjust the frame’s volume to reduce how loud the videos’ audio plays. - View Individual Video Clips

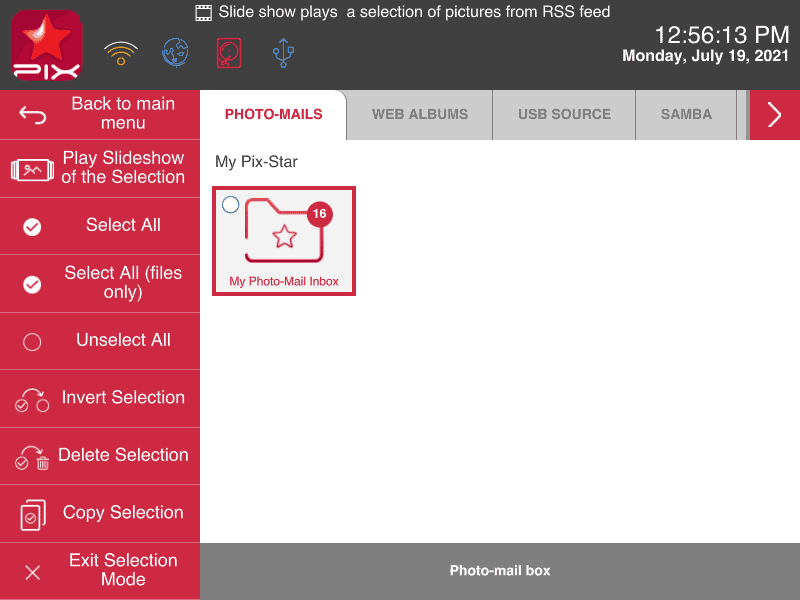
To view a specific video clip outside of slideshows, select “My media library” from the home screen and press “ok”. In the file explorer, all the photos and videos copied from a USB/SD card or sent through the Pix-Star Snap mobile app will be saved under the “Photo-mails” tab.
Here you can browse through all the folders and files you’ve previously copied or sent to your frame. Find the video file you want to play, select it, and click on the “Play slideshow of the Selection” to view the video file/files.


